
Hugo is an open-source static site generator written in Go. It typically takes only a few seconds to generate a website and is known as the “world’s fastest framework for building websites.” Users can write blog content using Markdown syntax. Combined with GitHub Pages, you can deploy your own blog without needing a server. It also supports private deployment methods using HTTP servers like Nginx and Apache. This article, based on the deployment process of this blog, details the above two deployment methods, as well as CI/CD automated deployment and internationalization (i18n) configuration.
English site - Github Pages access URL:
Chinese site - Nginx private deployment access URL:
Hugo Installation
Local Hugo installation: It is recommended to install the Hugo client locally when using it for the first time to facilitate debugging. During subsequent use, you can operate without the local Hugo client; simply editing Markdown files locally and uploading them to GitHub will trigger automated deployment. For details, see the GitHub Pages Automated Deployment and Private Automated Deployment sections.
-
Hugo Installation
Installation process - taking Windows winget as an example, installing the Extended version:
1
2
3
4
5
// Install winget install Hugo.Hugo.Extended // Uninstall winget uninstall --name "Hugo (Extended)"
|
|
-
Preview
If executed successfully, you can preview the website locally on port 1313:
1hugo server
|
|
-
Environment Configuration
Hugo manages environment configuration files under the
configfolder (this directory does not exist by default and needs to be created by the user). The directory structure is as follows:1 2 3 4 5 6 7mysite ├── config.toml └── config ├── development │ └── config.toml └── production └── config.toml
|
|
Theme Configuration
Thanks to Hugo’s rich theme library, we can easily and quickly obtain many personalized Hugo themes. You can browse the official theme library to pick a theme you like.
Below, we will use the hugo-theme-stack theme as an example.
-
Git Initialization
1 2 3 4 5// Enter the directory cd mysite // Git initialization git init
|
|
-
Configure the Theme
Open the newly downloaded theme files, copy the configuration file from the
themes/stack/exampleSitedirectory to the root directory, overwrite the original configuration file, edit the configuration file, and set thethemefield to the theme name created in the previous step, which isstack.Partial configuration description for hugo-theme-stack:
1 2 3 4 5 6 7 8 9 10 11// Base URL, used during page jumps baseurl: [https://example.com/](https://example.com/) // Theme name, should be stack here theme: hugo-theme-stack // Website title title: Example Site // Website copyright info copyright: Example Person
|
|
Open `https://username.github.io/` to see the static page you just uploaded.
-
Linking the Hugo Repository for Automated Deployment
Here, we use two different GitHub repositories:
-
blogrepository – used to store the original blog files, mainly in Markdown format. -
GitHub Pagesrepository – the repository created in the previous step, used to store the built static website.
The specific process is as follows:
-
Connect the permissions of the two repositories
-
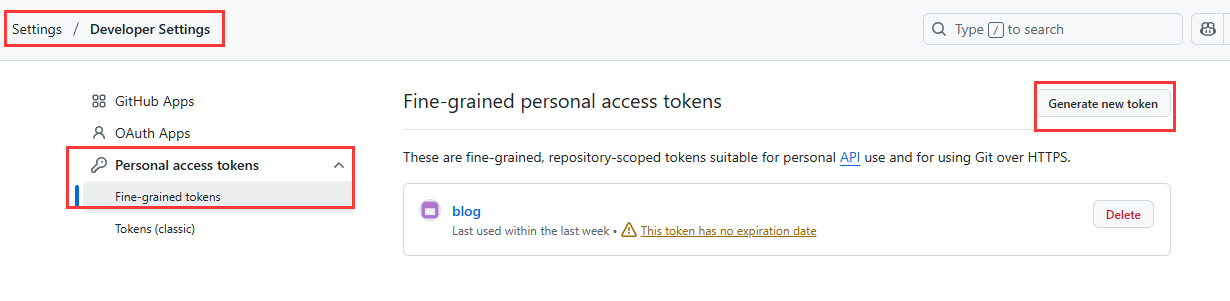
Open the GitHub global settings (not repository settings): Settings / Developer settings / Personal access tokens / Fine-grained tokens / Generate new token.
-
Token name can be filled in as you like.
-
Expiration: It is recommended to choose
No expirationto avoid it becoming unusable after expiring. -
Repository access: For security reasons, it is recommended to choose
Only select repositoriesand select only the GitHub Pages repository you just created.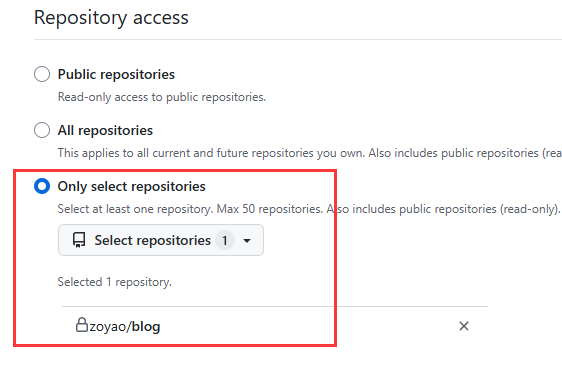
-
Permissions configuration: Change
ContentstoRead and write.
-
Save and copy the automatically generated token.
-
Add the token configuration to the
blogrepository. The path is:blogrepository / Settings / Security / Secrets and variables / Actions / Repository secrets / New repository secret. Name itPERSONAL_TOKEN, and paste the token copied in the previous step into the Secret and save it.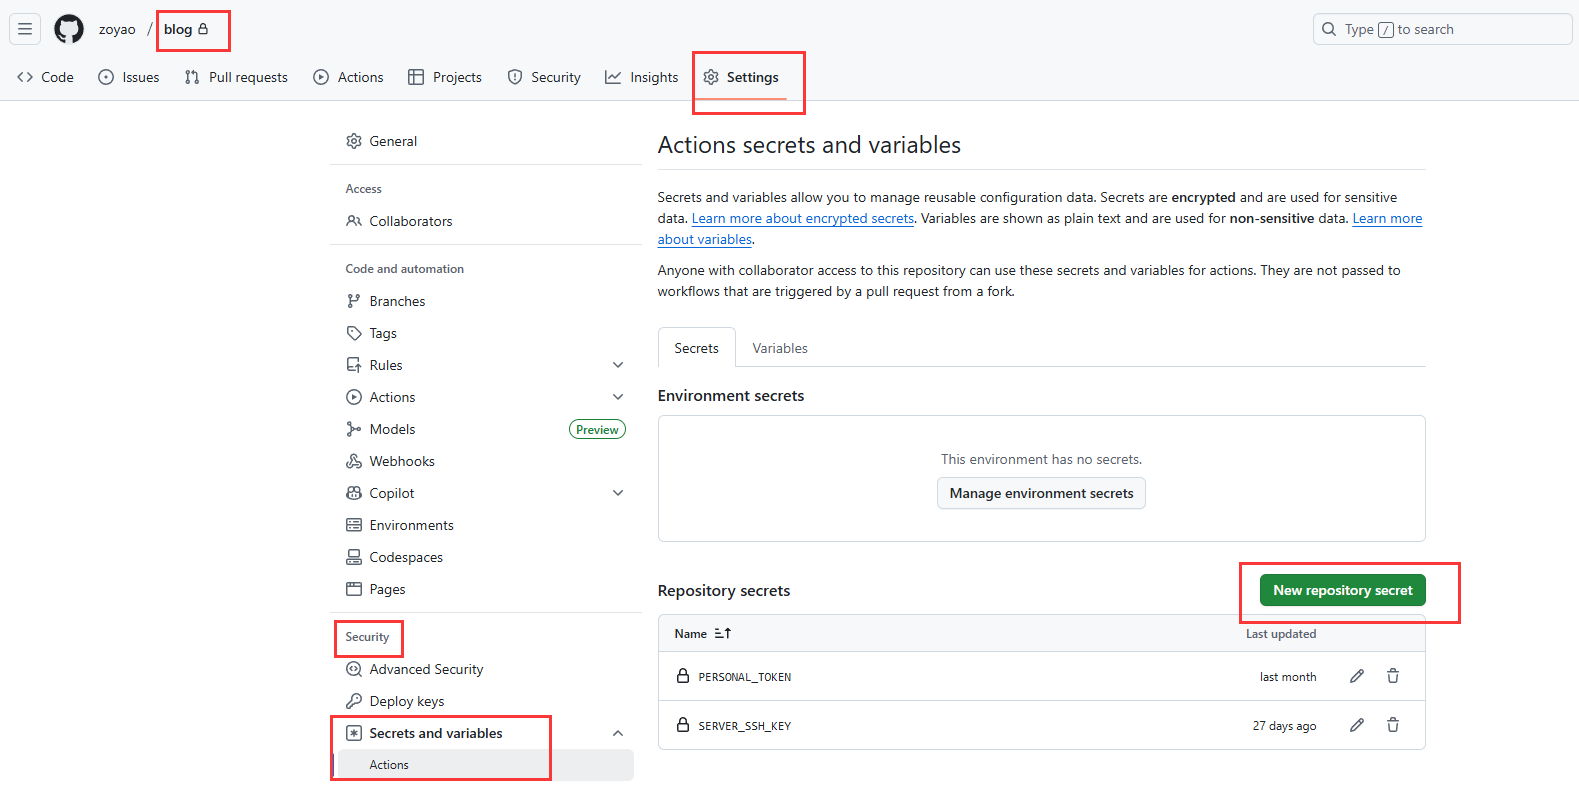
-
-
Hugo Automatic Build and Publish
In the
blogrepository’s.github/workflowsdirectory, createdeploy.ymlwith the following configuration:1 2 3 4 5 6 7 8 9 10 11 12 13 14 15 16 17 18 19 20 21 22 23 24 25 26 27 28 29 30 31 32 33 34 35 36 37 38name: deploy on: # Execute action on git push push: workflow_dispatch: schedule: # Runs everyday at 8:00 AM - cron: "0 0 * * *" jobs: build: runs-on: ubuntu-latest steps: - name: Checkout uses: actions/checkout@v2 with: submodules: true fetch-depth: 0 - name: Setup Hugo uses: peaceiris/actions-hugo@v2 with: hugo-version: "latest" # Hugo build - name: Build Web run: hugo # Push to specified repository after building - name: Deploy Web uses: peaceiris/actions-gh-pages@v3 with: PERSONAL_TOKEN: ${{ secrets.PERSONAL_TOKEN }} EXTERNAL_REPOSITORY: zoyao/zoyao.github.io PUBLISH_BRANCH: master PUBLISH_DIR: ./public commit_message: ${{ github.event.head_commit.message }}
-
|
|
3. After updating the Nginx configuration, access `http://Server_Public_IP:8888/` to see the blog homepage.
-
Automated Deployment
To use automated deployment, you first need to configure SSH key login. It is recommended to create a new user first for proper permission isolation.
-
Use the
addusercommand to create a new user, namedgithere (customizable):1sudo adduser git
-
|
|
3. Switch to the `git` user, create an SSH key, and save it in GitHub secrets.
- Switch to the git user:
```bash
su git
```
- Create a new directory `.ssh` under the `/home/git` directory and authorize it:
```bash
mkdir -p ~/.ssh && chmod 700 ~/.ssh
|
|
- Authorize `authorized_keys`:
```bash
chmod 600 ~/.ssh/authorized_keys
|
|
- Use SSH locally to verify if the login is successful.
- Add the key configuration to the `blog` repository. The path is: `blog` repository / Settings / Security / Secrets and variables / Actions / Repository secrets / New repository secret. Name it `SERVER_SSH_KEY`, and paste the private key copied in the previous step into the Secret and save it.

4. Configure GitHub Automated Deployment
In the `blog` repository's `.github/workflows` directory, create `deploy.yml`. The configuration content is as follows. Change the Server IP to your own private server IP.
```yaml
name: deploy
on:
push:
workflow_dispatch:
schedule:
# Runs everyday at 8:00 AM
- cron: "0 0 * * *"
jobs:
build:
runs-on: ubuntu-latest
steps:
- name: Checkout
uses: actions/checkout@v2
with:
submodules: true
fetch-depth: 0
- name: Setup Hugo
uses: peaceiris/actions-hugo@v2
with:
hugo-version: "latest"
- name: Build Web
run: hugo
- name: Deploy Web Self
uses: easingthemes/ssh-deploy@main
with:
SSH_PRIVATE_KEY: ${{ secrets.SERVER_SSH_KEY }}
REMOTE_HOST: Server_IP
REMOTE_USER: git
SOURCE: ./public/
TARGET: /app/blog/hugo/
ARGS: -avz --delete --chown=git:git
```
HTTPS Configuration
Here we use Alibaba Cloud’s free SSL certificate for HTTPS configuration. However, since the free certificate has a short validity period, we need to install acme for automatic renewal and updates.
-
Apply for Alibaba Cloud API
-
Create an acme access user
After logging into the Alibaba Cloud backend, go to Resource Access Management (RAM). Select Identities / Users, create a new user, check
OpenAPI Access(AccessKey), confirm, and save the corresponding key and secret for later use.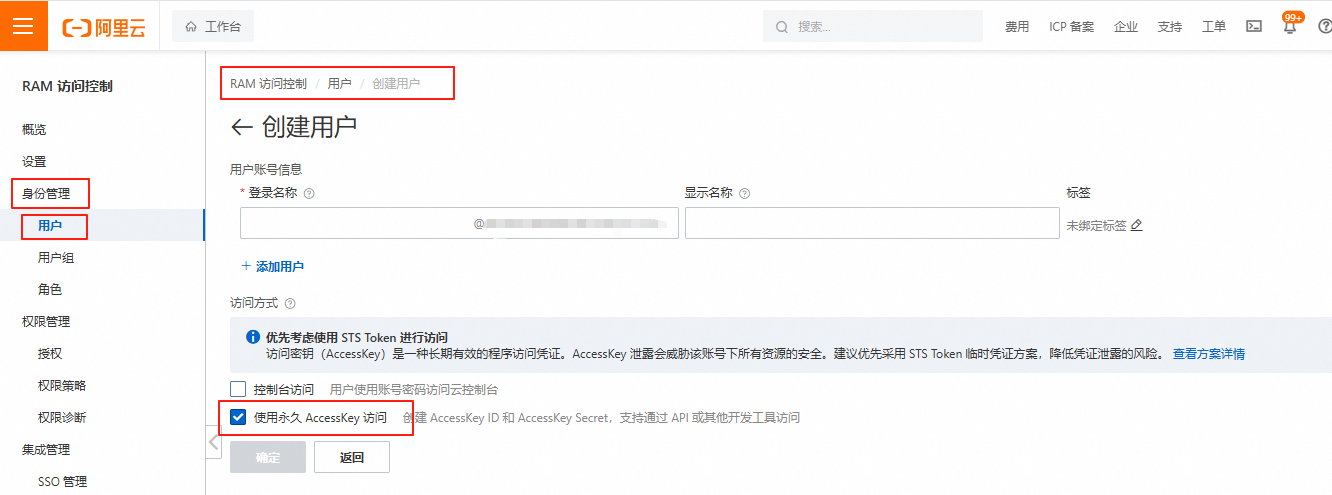
-
Configure permissions
Click Add Permissions and grant the new user the following permissions:
AliyunRAMFullAccess
-
-
Configure acme Automatic Updates
-
Install acme
1curl [https://get.acme.sh](https://get.acme.sh) | sh -s email=xxxx@xxxx.com -
Use the key and secret saved in step 1 to configure Alibaba Cloud’s system parameters:
1 2export Ali_Key="key" export Ali_Secret="Secret" -
Issue the certificate:
1acme.sh --issue --dns dns_ali -d zoyao.site -d '*.zoyao.site' --dnssleep 300 --debug
-
|
|
- Once successfully executed, you can view the certificate in the `/app/nginx/ssl/zoyao.site/` directory.
-
Nginx SSL Configuration
In Nginx’s
./nginx/conf.ddirectory, create a new configuration file, named here ascommon.conf.In the previous private deployment, we used port 8888 as the blog’s access port. Here we only need to forward the SSL 443 port to the 8888 port and configure the SSL certificate address. The configuration file is as follows:
1 2 3 4 5 6 7 8 9 10 11 12 13 14 15 16 17 18 19 20 21 22 23 24server { listen 443 ssl http2; listen [::]:443 ssl http2; # Configure blog domain name server_name www.zoyao.site zoyao.site; # The SSL certificate address saved in the previous step. Because it's a Docker deployment, the mapped address is configured here ssl_certificate "/app/ssl/zoyao.site/cert.pem"; ssl_certificate_key "/app/ssl/zoyao.site/key.pem"; ssl_session_cache shared:SSL:1m; ssl_session_timeout 10m; ssl_ciphers HIGH:!aNULL:!MD5; ssl_prefer_server_ciphers on; location / { # Forward the request to the port where the blog is actually deployed proxy_pass [http://127.0.0.1:8888](http://127.0.0.1:8888); # Forwarding rule proxy_set_header Host $proxy_host; # Modify forwarding request header so the app on port 8080 can receive the real request proxy_set_header X-Real-IP $remote_addr; proxy_set_header X-Forwarded-For $proxy_add_x_forwarded_for; } }At this point, the HTTPS deployment is complete. Open https://www.zoyao.site to access it.
i18n Internationalization
Hugo provides a complete internationalization solution natively. You can define different language setups in hugo.yaml.
Here, I have defined two languages: Chinese and English.
|
|
Correspondingly, in the articles, you also need different Markdown files to distinguish between different languages.
For example, for this article, index.zh-cn.md is used for Chinese.
In the same directory, you can create index.en.md for English.
You can configure the website’s default language through DefaultContentLanguage:
|
|
This website uses different default languages for different deployment methods. In zoyao.site, it defaults to Chinese, while in zoyao.github.io, it defaults to English. You just need to define the corresponding configuration in the config folder under the root directory.
|
|
Different configuration files use a different DefaultContentLanguage.
Similarly, during automated deployment, you can specify different configuration files to complete the deployment for the corresponding language environment:
|
|